Project Two Photos
Photography Advanced
Project Two
Tessa Georgoulakos


I used a background image of my subject moving for my first montage. I then used the marquise tool to crop the image and then a vector mask to make individual photos (about 6 more). After that, I used a gradient tool to fade them in the direction I wanted. Over this, I added an orange layer and used a filter to simulate clouds, all while altering the layer's luminance. I also increased the vibrancy and brightness of the image. I wanted the image to appear as though she's having a good time and running around doing various things.
Summary Statement:
It was a lot of fun to experiment with and learn new things. This was my first montage, and I was hoping to do a good job of blending everything together. It took a lot of trial and error to get the photos to merge and move the way I wanted. Overall, I feel like I changed the image quite a bit because there was a lot of empty space that I wanted to fill.


I chose my subject and generated a vector mask for this image. I used five different photographs and positioned them behind my subject. I went to effects and added a drop shadow behind my subject as well as adding vibrance to the image. I wanted it bright and vibrant with a lot of orange for fall.
Summary Statement:
Initially, I attempted to combine the images within my subject. The background was original, which consisted solely of pumpkins. I didn't like how it looked, so I modified it to this, which I thought fit better. This was a lot of fun to do and I'm thinking about trying new shapes for the pictures next time.


I started out with my background image with the sign and then added four separate images. For the Krupski Farms I added a color overlay and a drop shadow. I selected the subject in each and deleted their original backgrounds. I then placed them around the image and added a slight blue filter above the image.
Summary Statement:
This was a silly project of mine. I just wanted a fun photo, so I put a goat's head on the sign and my kid as a ghost floating through the air. This one was a funny, entertaining way of depicting the enjoyment we had at the farm. Except for the krupski pumpkin, I didn't apply any drop shadows to the images. Overall, I didn't make much changes to the background, but I did try to leave as much of the text visible as possible.


This was arguably the most difficult shot I think I've taken. This is my effort at creating a panoramic image. These were taken on a tripod, and the four images shown above were used. By selecting File > Automate > Photomerge and checking "Blend Images Together," I was able to sew my panoramic together. I chose these four photographs and Photoshop automatically stitched them together for me. To make my panorama complete, I merged the layers and trimmed them.
Summary Statement:
This one was more difficult than I anticipated. Until I turned them into a Panoramic in Photoshop, I believed they were all perfectly aligned. To make the photograph look good, I had to crop it a lot. That's why it appears so thin. Overall, I'd like to better these, but I'm pleased with how it turned out.

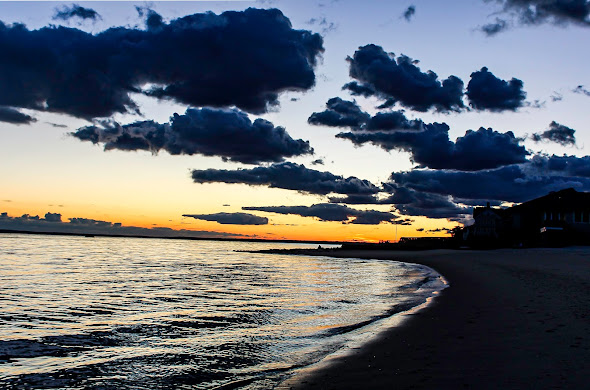
This was my first attempt at HDR photography. I began by importing the photographs into Photoshop and selecting File > Automate > HDR Pro. To allow Photoshop to repair the image, I converted it to 32-bit and removed ghosts. The photograph was then toned and exposure, shadows, clarity, and warmth were all adjusted. The image was then rotated slightly and trimmed to fit.
Summary Statement:
I'd never made a shot like this before, so it was a great learning experience for me. For the first time, I learned how to convert pictures to HDR. It was challenging for me to learn at first, but I am eager to take more HDR images in the future so that I can progress.
Comments
Post a Comment